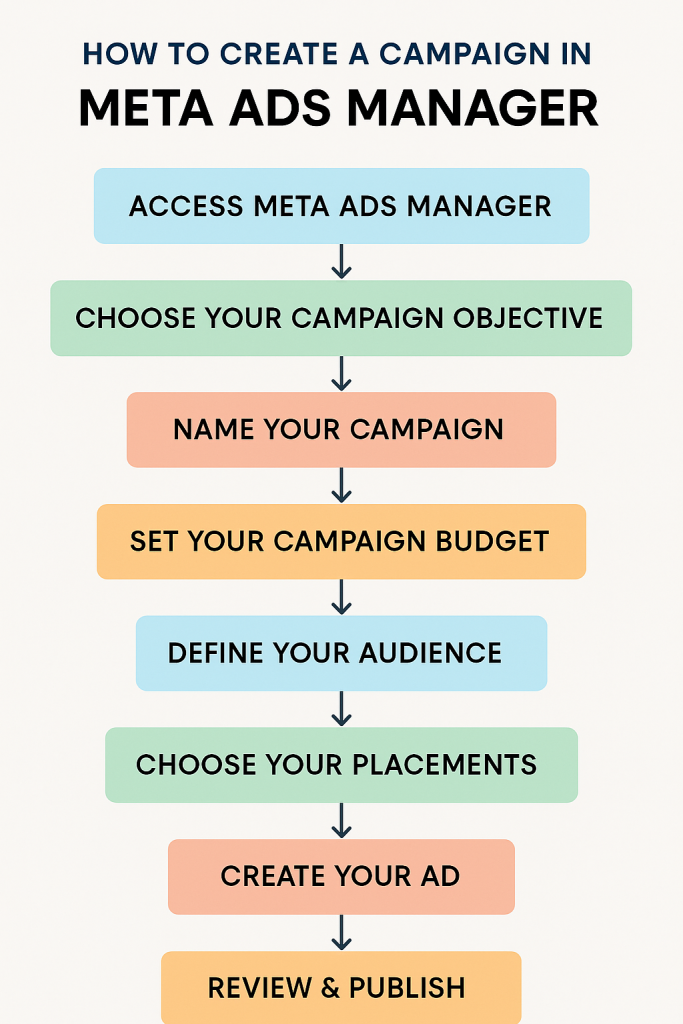
Running Meta ads ads on (Facebook and Instagram) is one of the fastest ways to get your brand in front of the right audience. Meta Ads Manager is the tool that makes it all happen — but if you’re new to it, all those buttons, terms, and options can feel overwhelming.
Don’t worry — this guide will walk you through the process **step-by-step**, so you can launch your first campaign confidently.
–Step 1: Access Meta Ads Manager
To get started, log in to your Facebook account and go to:
[https://business.facebook.com/adsmanager](https://business.facebook.com/adsmanager)
If you haven’t already:
* Set up a **Meta Business Account**.
* Add your **Facebook Page** and **Instagram account**.
* Set up **payment methods** under *Business Settings → Paymen t*.
Step 2: Choose Your Campaign Objective
Click **Create Campaign**. You’ll see three main objective categories:
1. **Awareness** – Increase brand visibility.
2. **Consideration** – Drive engagement, website visits, or lead forms.
3. **Conversions** – Get purchases, sign-ups, or other valuable actions.
💡 **Tip:** If you’re just starting, try *Traffic* to send visitors to your site or *Leads* to collect customer info.
—
Step 3: Name Your Campaign
Give your campaign a clear name, for example:
`Jan 2025 – Lead Gen – Fitness Studio – Awareness`
This helps you track results later.
—
Step 4: Set Your Campaign Budget
You can choose:
* **Daily Budget** – Spend a fixed amount every day.
* **Lifetime Budget** – Spend a set amount for the entire campaign duration.
💡 Start small (₹300–₹500 per day) and scale as you see results.
—
Step 5: Define Your Audience
This is where targeting magic happens:
* **Location** – Select countries, states, cities, or even a specific radius.
* **Age & Gender** – Match your ideal customer.
* **Detailed Targeting** – Choose interests, behaviors, and demographics.
Example: *People interested in “Organic Food” and “Healthy Living”* for a cold-pressed oil brand.
* **Custom Audiences** – Upload your customer list or retarget website visitors.
* **Lookalike Audiences** – Find new people similar to your best customers.
—
Step 6: Choose Your Placements
Decide where your ads appear:
* **Automatic Placements** (recommended for beginners) – Meta chooses the best spots.
* **Manual Placements** – Select Facebook feed, Instagram Stories, Reels, Messenger, etc.
—
Step 7: Create Your AD
Now the fun part — design your ad!
* **Format** – Single image, video, carousel, or collection.
* **Primary Text** – Keep it short, catchy, and benefit-focused.
* **Headline** – Eye-grabbing and clear.
* **Call-to-Action (CTA)** – Examples: *Shop Now, Learn More, Sign Up*.
* **Media** – Use high-quality images or short videos.
💡 Use tools like **Canva** to create engaging creatives.
—
Step 8: Review & Publish
Before you launch:
* Double-check targeting, budget, and creatives.
* Preview how your ad looks on mobile and desktop.
* Click **Publish**.
Meta will review your ad for policy compliance before it starts running.
—
Step 9: Monitor & Optimize
Once your ad is live:
* Check performance metrics like **CTR (Click-Through Rate)**, **CPC (Cost Per Click)**, and **Conversions**.
* Pause underperforming ads and allocate more budget to the best ones.
* Test different creatives, audiences, and copy to improve results.
—
### **Quick Tips for Success**
* Always use **clear, benefit-driven ad copy**.
* Avoid too much text on images.
* Keep videos under 30 seconds for better engagement.
* Track results in **Meta Ads Manager Reports**.
—
### **Final Thoughts**
Creating a Meta Ads campaign isn’t as complicated as it looks — once you’ve done it a couple of times, it becomes second nature. The key is to start small, test, and refine your strategy.
At **Digitroverts**, we help businesses run high-performing Meta Ads that bring real results.
📩 **Contact us today** to plan your next winning campaign!
—
Do you want me to prepare that graphic?